Thursday, February 17, 2011

Shoulder Theraband Strengthening

Shoulder Tubing Program
Created by Beau Lowery, PT, ATC

In doing all of your tubing work, stagger your feet with your dominant foot back and your throwing shoulder blade retracted (as seen below). Go through a full range of motion and understand this is a strengthening program, not stretching. You should do 3-4 sets of each exercise and feel a good burn for the last 3-5 reps. Repetitions should be around 15-20. When you can do more than 20 reps, get a stronger band/tube.

1. Shoulder External Rotation with elbow by side. Be sure to keep your elbow by your side with the towel between your arm and chest. Maintain a 90 degree angle at your elbow and rotate externally as far as comfortable, then slowly return to full internal rotation. Keep your wrist in a neutral position, and concentrate on good posture with your ear directly over your shoulder. Do 3 sets to fatigue (around 15-20 reps).

Start position:

End position:
2. Shoulder Internal Rotation with elbow by side. Be sure to keep your elbow by your side with the towel between your arm and chest. Maintain a 90 degree angle at your elbow and rotate internally until you touch your stomach, then slowly return to a comfortable external rotation position. Keep your wrist in a neutral position, and concentrate on good posture with your ear directly over your shoulder. Do 3 sets to fatigue (around 15-20 reps.) Get a stronger band if your reps exceed 20 each set.

Start position:
End position:
3. Shoulder extension. Concentrating on good posture, retract your shoulder blade and pull backwards, while keeping your elbow straight, until your arm is even with your body. Be slow and controlled getting a good concentric, isometric, and eccentric contraction. Do 3 sets to fatigue.

Start position:
End position:
4. Shoulder External Rotation @ 90 degrees of abduction. Keep your elbow in the same plane of your shoulder. Keep your wrist locked and externally rotate your shoulder until your forearm is even with or just past your ear. Do 3 sets to fatigue (around 15-20 reps.) Get a stronger band if your reps exceed 20 repetitions each set.

Start position:
End position:
5. Scapular Retraction. Concentrating on good posture, stagger your feet, retract your shoulder blade, and pull your arm backward but concentrate on pulling your shoulder blade into a retracted position.

Start position:
End position:
End position (posterior view):
6. PNF - D2 Diagonal Pattern. Begin in an athletic position with your thumb down and only a slight bend in your elbow. Keep your elbow relatively straight while moving your arm into flexion. Also, rotate your thumb into the up position and retract your shoulder blade at the top of the movement. Then slowly return to the starting position.

Start position:
Mid position:
End position:

Table Top Weights Shoulder and Elbow Exercises

Scapula Stabilization/Rotator Cuff Program
Created by Beau Lowery, PT, ATC

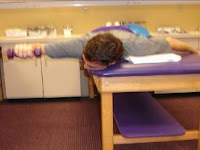
1. Y's. Hold weights in a neutral wrist position with your thumbs toward the ceiling. Set your shoulder blades and raise your arms to full flexion. Keep your elbows straight and concentrate on squeezing you shoulder blades together. You can also use just your throwing arm and have your head supported if this positioning causes any neck pain. Do 3 sets to fatigue (approx. 15-20) using between 2-5 lbs. Do not go over 5 lbs.

Start position:

End position:

2. T's. Hold weights in a neutral wrist position. Set your shoulder blades and raise your arms to the side. Keep your elbows straight and concentrate on squeezing you shoulder blades together. You can also use just your throwing arm and have your head supported if this positioning causes any neck pain. Do 3 sets to fatigue (approx. 15-20) using between 2-5 lbs. Do not go over 5 lbs.

Start position:End position:
3. V's. Hold weights in a neutral wrist position. Set your shoulder blades and raise your arms to the side. Keep your elbows straight and concentrate on squeezing you shoulder blades together. You can also use just your throwing arm and have your head supported if this positioning causes any neck pain. Do 3 sets to fatigue (approx. 15-20) using between 2-5 lbs. Do not go over 5 lbs.

Start position: End position:
** Important to understand with the 3 previous exercises you are strengthening the muscles of your shoulder blades as well as your shoulder. If you have neck pain, you can do your throwing arm only by hanging your shoulder off the side of the table with your head supported on the table. Always retract your shoulder blade first, then lift you arm in a pain-free range. Do not try to push through any pain or abnormal sensations. You want to feel a good muscle burn, but no catching or pinching sensation. Also, the reps are very person specific. I want you to feel a good burn the last 3 reps; therefore, if you feel a good burn during reps 7, 8, and 9, stop at 9 instead of 15. I encourage you to start with 2 or 3 lbs and progress with weight when you are able to do 20 reps for 3 sets and do not get fatigued. At that point, increase the weight and adjust your reps. Five pounds is the limit you use from a weight standpoint.

4. Prone external rotation @ 90 degrees of shoulder abduction. Start by lying on your stomach with your shoulder hanging off the edge of the table. Squeeze your shoulder blade back while lifting your arm even with your body. Then externally rotate your shoulder until your forearm is parallel to the floor. Make sure your movements are slow and controlled going up and down through the motion. Do 3 sets to fatigue (approx. 15-20) using between 2-5 lbs. Do not go over 5 lbs.

Start position:Mid position:End position:

5. Side lying external rotation. While lying on your side with a towel under your arm, retract your shoulder blade and slowly lift your arm while maintaining a 90 degree angle @ your elbow. Lift your forearm as seen in the picture below. Do not push through any pinching or painful sensation.

Start position:Mid position:End position:

6. Side lying internal rotation. While lying on your dominant side, slowly lift your arm while maintaining a 90 degree angle @ your elbow. Lift your forearm as seen in the picture below. Do not push through any pinching or painful sensation. Do 3 sets, approx. 15-20 using between 3-7 lbs. Do not go over 7 lbs. Be sure your shoulder is in front and you have no discomfort when going through full internal shoulder rotation. You will probably not feel the same intensity of burn because your internal rotators should be stronger than your external rotators.

Start position:

Mid position:

End position:

7. Supine Shoulder Protraction. While lying on your back and weight in you’re your hand, push your hand toward the ceiling. Your shoulder will actually protract and your hand will move toward the ceiling. The movement comes from your shoulder only and there should be no movement from your elbow.

Start position:End position:

8. Table Top Push Ups. This is a modified way of doing push-up plus except with less stress on the shoulder. Use the same principle as push-up or bench press - never go all the way until your chest touches the table. When you extend your elbow, protract your shoulder blades until you feel the hump in your upper back. Do 2-3 sets of 20 reps.

Start position:

End position:

Friday, January 28, 2011

Patellar Tendonitis

LSU Volleyball Patellar Tendonitis Protocol

Treatment:

  1. WARM-UP: make sure you warm up before any activity. You may get on a bike, or use a heat pack or hot tub if available.

  2. ICE: Ice the knee after all activity. This will help alleviate pain and reduce inflammation. Do this immediately after activity and again at night before bed.

  3. MEDICATION: You may take over-the-counter anti-inflammatory medication, as directed, such as Advil, Aleve, or Ibuprofen.

  4. TAPING/BRACING: you may want to use a strap or tape job over the patellar tendon. The cheapest way is to take pre-wrap and wrap it around the leg and roll it up into a small tube and allow it to rest on the patellar tendon where the most pain is present. Do this under your kneepad and use the kneepad to keep it in place. You may also purchase a strap used for “jumper’s knees”, however, this may not be as comfortable under the kneepads.

  5. STRETCHING: you should be stretching the entire leg daily. Emphasis should be placed on the quadriceps muscles as the patella is connected to them. You may want to consider using a foam roller if available.
    REST: if you are currently in season or doing heavy lifting in a weight room, you should back off the squats or plyometric work (jumping).

Rehabilitation:
The main goal to strengthen and stretch the quadriceps muscles.
These exercises should be done 3-4 times a week. Proper technique is very important, or you could actually make your injury worse.

  1. Straight Leg Raise 4x25 reps. Lying on your back, raise your leg up with the knee straight. Variation: add a cuff weight to the ankle.

  2. Leg Extensions 4x15 reps. If you have access to a weight room, you may use the leg extension machine, use one leg at a time. If not, sit on a table with your legs hanging off and using one leg at a time straighten your leg at the knee joint. You can increase resistance by adding a cuff weight to your ankle or wrapping elastic bands around your ankle and the table leg.

  3. Wall Sits 3x1min. Variations: ball behind your back or ball between your legs, squeezing your legs together.

  4. Body Weight Minisquats 5x20 reps. Do not allow your kneecap to go in front of your toes. Variation: one leg at a time.

LSU Women’s Basketball Jump Training Program

Created by Micki Collins, ATC

The following exercises can be done 3x’s per week-but no more. Read the instructions to make sure you are landing properly!!

Picture references can be found below.

Phase I

Week 1:

  1. 180 Jumps: 2 foot jumps, rotate 180 degrees in midair, hold landing 2 seconds, then repeat in reverse direction. 1 x 6

  2. Bounding in place: jump from one leg to the other, straight up and down, progressively increasing rhythm and height. 2 x 15

  3. Jump, Jump, Jump, Vertical: three broad jumps with vertical jump immediately after landing the third broad jump. 1 x 5

  4. Broad Jumps: as far as possible, hold landing 5 seconds. 1 x 5

  5. Wall Jumps, Ankle Bounces: with knees slightly bent and arms raised overhead, bounce up and down off toes. 3 x 15 seconds

Week 2:


  1. 180 Jumps: 2 foot jumps, rotate 180 degrees in midair, hold landing 2 seconds, then repeat in reverse direction. 1 x 6

  2. Bounding in place: jump from one leg to the other, straight up and down, progressively increasing rhythm and height. 2 x 15

  3. Jump, Jump, Jump, Vertical: three broad jumps with vertical jump immediately after landing the third broad jump. 1 x 5

  4. Broad Jumps: as far as possible, hold landing 5 seconds. 1 x 5

  5. Wall Jumps, Ankle Bounces: with knees slightly bent and arms raised overhead, bounce up and down off toes, 3 x 20seconds

Week 3:


  1. 180 Jumps: 2 foot jumps, rotate 180 degrees in midair, hold landing 2 seconds, then repeat in reverse direction. 1 x 8

  2. Bounding in place: jump from one leg to the other, straight up and down, progressively increasing rhythm and height. 2 x 20

  3. Jump, Jump, Jump, Vertical: three broad jumps with vertical jump immediately after landing the third broad jump. 1 x 6

  4. Broad Jumps: as far as possible, hold landing 5 seconds. 1 x 6

  5. Wall Jumps, Ankle Bounces: with knees slightly bent and arms raised overhead, bounce up and down off toes, 3 x 30seconds.

Phase II

Week 4:


  1. Bounding for Distance: start bounding in place and slowly increase distance with each step, keeping knees high. 3 x 15

  2. 360 Jumps: 1 x 10

  3. Wall Jumps: 4 x 30 seconds

  4. Scissor Jumps: start in stride position with one foot well in front of the other, jump up, alternating foot positions in midair. 1 x 12

  5. Single Legged-Jumps Distance: one legged hops for distance, hold landing, knees bent for 5 seconds, 1 x 5

Phase III
Week 5:


  1. Bounding for Distance: start bounding in place and slowly increase distance with each step, keeping knees high. 3 x 15

  2. 360 Jumps: 1 x 10

  3. Wall Jumps: 4 x 30 seconds

  4. Scissor Jumps: start in stride position with one foot well in front of the other, jump up, alternating foot positions in midair. 1 x 15

  5. Single Legged-Jumps Distance: one legged hops for distance, hold landing, knees bent for 5 seconds. 1 x 6

Week 6:


  1. Bounding: 3x’s through

  2. Wall Jumps: 4 x 15 seconds

  3. Squat Jumps: standing jump raising both arms overhead, land in squatting position touching both hands to the floor. 1 x 6

  4. 360 Jumps: 1 x 10

  5. Scissors Jumps: start in stride position with one foot well in front of the other, jump up, alternating foot positions in midair. 1 x 12

  6. Hop, Hop, Stick: single-legged hop, stick second landing for 5 seconds, increase distance of hop as technique improves. 1 x 8

Week 7:


  1. Bounding: 3x’s through

  2. Wall Jumps: 4 x 15 seconds

  3. Squat Jumps: standing jump raising both arms overhead, land in squatting position touching both hands to the floor. 1 x 6

  4. 360 Jumps: 1 x 10

  5. Scissors Jumps: start in stride position with one foot well in front of the other, jump up, alternating foot positions in midair. 1 x 12

  6. Hop, Hop, Stick: single-legged hop, stick second landing for 5 seconds, increase distance of hop as technique improves. 1 x 8

Week 8:


  1. Bounding: 3x’s through

  2. Wall Jumps: 4 x 15 seconds

  3. Squat Jumps: standing jump raising both arms overhead, land in squatting position touching both hands to the floor. 1 x 6

  4. 360 Jumps: 1 x 10

  5. Scissors Jumps: start in stride position with one foot well in front of the other, jump up, alternating foot positions in midair. 1 x 12

  6. Hop, Hop, Stick: single-legged hop, stick second landing for 5 seconds, increase distance of hop as technique improves. 1 x 10

180 Jumps

Bounding in Place

Jump, Jump, Jump, Vertical


Broad Jumps


Wall Jumps, Ankle Bounces


Bounding for Distance


360 JumpsScissor JumpsSingle Leg Jumps for Distance


Squat Jumps


Hop, Hop, Stick

ACL Jump Training

LSU Women’s Basketball ACL Jump Training Program
Created by Micki Collins, ATC

Level 1
Jump Rope 200 reps
  • Begin with 2 foot hops

  • Progress to alternating feet, skiers, side to side, and single leg hops as tolerated

  • Quick Box Jumps (8 inch box)


  • Up-Up-Down-Down 2x15 reps


  • Switches 2x15 reps

  • Quick Jumps 2 feet- 2x15 reps


    • Two Foot Box Jumps (12-18 inch Crown Gym Mat Boxes) 3x10 reps


      • Take off with both feet

      • Use your arms

      • Concentrate on sticking the landing

      • Land with soft knees

      Level 2


      Depth Jumps 4x8 reps


      • Stand on 12 inch box. Step off and as soon as you hit the ground, explosively jump onto a higher box (18-24 inches)

      • Spend as little time on the ground as possible

      • Concentrate on your landing

      Practice Vertical Jump 4x5 reps


      • Feet hip width apart

      • Hands at shoulder level

      • Explosively dip and jump straight up. Reach and extend with your dominant arm

      Jump Rope-same as level 1, but progress to more advanced exercises


      Quick Box Jumps-same as level 1


      Level 3


      Hurdle Hops x5


      • Stand on 12 inch box. Step off and jump over a series of adjustable hurdles

      • After jumping over the last hurdle do a long jump as far as possible

      • Stick the landing

      Tuck Jumps 3x15 reps


      • Jump explosively with both feet, bringing your knees to chest and getting gas high as possible

      • Be quick off the ground and use your arms

      Standing Long Jump x3


      • Drill is done form one end of the platforms in the weight room to the other

      • Try and get to the end in as few jumps as possible

      • Recover after each jump, reset, and explode out as far as possible

      • Use your arms, stick the landing

      Single Leg Explosive Jumps 3x10 reps each leg (advanced)


      • Start with one leg on a 12-15 inch box (you want the quad close to parallel to the ground

      • Explosively jump up, getting as high as possible

      • Switch legs in midair so that you come down with the opposite leg on the box

      • Drive up explosively with the opposite leg

      • Repeat until prescribed reps are completed